Thursday, February 16, 2012

Some Travel Sewing

In preparation for our families trip to Maui, I have been busy sewing a few things.  I guess you could say the excitement of our upcoming holiday has me taking a break from home decor.


1. A wallet for my son using noodlehead's great tutorial.  Made entirely from fabric and notion scraps. I added a change pocket to his.
2. A messanger bag for my daughter inspired by Gingercake's.  Again using fabric scraps.
3. A dress for my daughter using i candy handmade's tutorial.  An old tank top and clearance bin fabric.
4. A bolero for my daughter inspired by Heidi and Finn's Bolero Pattern. Remade from an old sweater of mine.
5. A carry-on bag inspired by this Bench Sports Bag.  It is the perfect carry-on size for packing my kids clothes.  Made entirely from left-over suiting material and 2 old bags. 
6. A sweater coat for myself inspired by a Pusch sweater my sister owns. 2.5 meters of clearance bin jogging fleece.

Am I done?  Depends how much more I can squeeze into the next 2 weeks.  I hope to remake an old skirt into a sundress, and some little pods for all our ear phones to keep them tangle free.  Also possibly remake a couple of t-shirts. 

Thursday, February 9, 2012

Making It Work

After some debating, we decided to make memories for our family rather than some of the home improvement projects I have on my list this year.  So I booked our tickets to Maui and then got busy making a few problem areas in our house work, using what we already own. 


This is a change table that my father made us, with love, when we were expecting our first child.  It is beautiful and something I will hold on to for a long time - maybe ever.  However,  this room is doing it no justice and it is not functioning well as a violin cabinet.  You can see my violin resting on the top of the piano.  It is supposed to be stored inside the cabinet but then is not convenient for the everyday practicing that I am trying to do with my son, so most often sits atop the piano.  I also do not like that it is the same height as the piano (I like to keep things staggered for visual interest) and there is so much wood going on here!!  Due to its depth, it also consumes a lot of space in this room making it feel more cramped.

Off I went to shop my house and see what else I have that would function better in this room for our needs.


This is the only piece I found that wasn't already serving well for another purpose.  It is a small china cabinet that came from my great Aunt Ethel.  It is not an antique, nor a solidly handcrafted piece, nor made of high quality wood, and has broken glass side panels.  The other pieces that were once a part of this set are long gone.   However, it was the correct dimension for housing a full-size violin and taller than the piano.  A little fixing up and it would make my frustrating violin situation workable!!!


The doors were removed.  The broken glass in the sides was replaced with 1/2 inch mdf cut to size.  All the holes and dings were filled with wood filler and sanded smooth.  Then primed and painted with Benjamin Moore's North Sea.  It actually is a dark navy color, however this room is always washed with natural sunlight so it appears lighter in photos.  All the supplies used were on hand except for the quart of North Sea paint.


It is helping to breakup all the wood going on in this room.  Although the piano is not my choice of color I am working with it as it was my Father's engagement gift to my Mother.  It has had many hours of memories for my family during childhood music lessons and soon my daughter will be learning on this piano.


It fits our violins perfectly and makes them easy to access for our daily practicing!! There is also a little room for storage of our most current music in the doors below and room for my sons most recent achievement framed to keep him motivated.  The current certificate displayed is his distinction (94%) performance at the music festival.  (Maybe it's more for his proud mother than him.)

This is not the end of my vision for this room.  I am picturing a gallery wall around the violin cabinet and the room painted a dark, moody color. 

Here are a few photos so you can have an idea of what I am dreaming of.


I think this color would do wonders for my 'orangeish' piano.


If only I had the paint I would be doing it right now.  But the stores are closed and the kids are in bed so this paint project will wait for another day. 

Wednesday, February 1, 2012

Because You asked

I have had a few questions stemming from my spring cleaning post way back in March 2011 about the homemade cleaner I use.  I wish I could say that I made the switch due to some noble thoughts about my concern for the environment and the health of my children.    Not that I didn't take precautions to limit my use of cleaning chemicals and make sure there was proper ventilation when in use so my children wouldn't be breathing these harmful fumes, I just in all honesty had doubts about the effectiveness of homemade cleaners and only tried them out of pure necessity.  The impending arrival of guests for a small gathering we were hosting, and an empty bottle of windex had me searching google for a quick recipe for window cleaning.  I wish I could remember the original source for this recipe.  It is just a simple combination of regular kitchen supplies.


Equal parts vinegar and dish soap mixed with about double the water. 

For one windex bottle I use about 2 Tbsp vinegar and 2 Tbsp dish soap and the rest water.  For really tough grime such as soap scum in the shower, heat the vinegar in the microwave until hot first before mixing with the dish soap and use less water (or none).  Then spritz on and leave it to work its magic (even overnight).

I use this cleaner for everything.  Windows, mirrors, counters, tubs, tile, showers etc.  When washing my hardwood floors I only omit the dishsoap and just use a combination of vinegar and water.  I am amazed at the power of this simple formula and I have not turned back to chemical cleaners since I made the switch well over a year ago.  I love that I can also involve my children in cleaning worry free now.  As for what I use for a cleaning cloth....  all those flannel receiving blankets that have been spit on and washed countless times are now cut into rags since I no longer have babies in my house.

One last cleaning tip.  From the numerous times we have sold houses in the past, one things realtors have always stressed is making a good first impression.  So regardless of how dirty the rest of the house is, the front entrance is the first thing to become sparkling clean.  Those sidelights on the front door are handprint and streak free as well as the full length mirror to the right of the door.  I also wipe the walls down in this area frequently and keep the baseboards chrisp and dust free.  It works, trust me.  My friends all seem to have this impression that my house is always so clean when really it is just the front entrance that has given them this impression. 


Monday, January 23, 2012

Defining the space with drapes

I have been busy whirring away on the sewing machine lately.  The difference is subtle but it sure adds a touch of class.


Above is a picture of our dining nook before the addition of drapes.


And after.  I chose to only add the drapes to the patio doors on each side of the bank of windows.  I feared adding drapes to all four windows would enclose and darken the space too much.  We still have a light and bright space with unobstructed views of the mountains and the class of drapes.


I purchased 12 meters of mixed fiber fabric (a very similar look to dupioni silk but half the price and washable) and the same of drapery lining to make these 4 panels.  The sewing was very easy with basically four straight seams.  The only thing I did different than sewing regular curtain panels was keep the lining short on each side and the bottom by 3 inches to give them a natural balloon and keep the lining (which is white) from making an appearance.


They have a little bit of a shimmer and a subtle brown fleck added in with the charcoal grey to give them a little more dimension and texture.


I love how they are so subtle, yet help to define and bring warmth to this space. 


Tuesday, January 3, 2012

Stump Trivets

You may remember way back in October I posted about the stump tables I created out of a cedar log I hauled back from my parents cabin.  The log gave me three 19" sump tables with a 12" chunk remaining.  The remnant piece of stump sat in our front flower bed until I finally had inspiration to use up the remaining chunk. 

STUMP TRIVETS.  You know those 'hot plates' or 'coasters' you use on the table to protect it from heat stains.


How did I create these?


Using a hand saw I cut through the stump about 1.5-2" from the edge leaving me a rough trivet.


This is the saw I used.  It is for rough cutting and I picked it up from Home Depot for $16.  Make sure you use a rough cut saw as it will save you tremendous amounts of cutting time. 

The first trivet I sanded with my palm sander, however, the next day I had to run out to my parents house so the remaining trivets I quickly ran through the belt sander.

I finished them with two coats of Tree Spirit All Natural Wood & Bamboo Oil.  It is a food safe oil that penetrates, conditions, and seals unfinished surfaces. This I purchased from Crate and Barrel a few years ago to use on my wood cutting boards.  I will continue to re-apply the oil as I do my cutting boards to keep them fresh.

We use these trivets every day and love the dimension they add to our table top.


Monday, January 2, 2012

Lending a Hand

My in-laws are in the midst of building a new ten resident seniors care home.  Things are running a bit behind schedule in construction and they are anxious to get into operation mode so they asked if we would come help complete a few projects over the holidays to help speed things along.  We headed out to Regina for a week and 4 1/2 of those days my husband and I worked at the care home while grandma had some bonding time with her grandkids.

Here is just a few quick photos of the things we completed in those 4.5 days.  (You'll have to excuse the iphone photos.)


This one is my favorite of the work we completed.  On either side of the front entry is a closet.  On the right side of the door we created a welcome bench in the closet opening for the seniors to sit down and remove their shoes, or wait for their ride.  We were given free reign on this one so my husband and I created this design.


Next up was the fireplace.  Because of time constraints a lot of fireplace surround options were out of the question.  We decided to bring this flexxstone product with us from Calgary as an option as we have used this product in our own home and have loved the results and the install is fast and easy.  It is a real stone veneer.


And last but not least we installed the kitchen backsplash tile. 

 It was a little unnerving when we first arrived working amongst all the contractors but we bluffed our way through and I don't think anyone could tell the difference between our DIY work and the trained professionals.


FYI - My Timber and Chrome Console Table is being featured on Remodelaholic sometime this afternoon.

Tuesday, December 6, 2011

Timber and chrome console table

I have had a few different ideas floating around in my head for a console table for a while now.  I never could seem to settle on one plan though.  Then one day my mom and dad were cleaning out their shop and came across a piece of old barnwood.  Rather than burn it they decided to check if I wanted it first.  YES PLEASE!

It was the perfect dimensions to become the top of my console table.


So I got to work.


Here is the barnwood in all its natural beauty.  I wanted to keep the general rustic appeal of this piece so all I did was give it a light sanding with 60 grit 3M (the best) sandpaper so the sharp edges would be smoothed out to ensure no one risked a sliver or ripped clothes.  I didn't even square off the edges.  I like that the one end was cut at a slight angle.


Then I wiped it down with Minwax Pre-stain Wood Conditioner and stained it with Minwax Jacobean stain.  


And finished it with 3 coats of polyurethane.


Next came the metal base.  Although learning to weld is on my bucket list of things to do, and my father even has a welder in the deep recesses of his storage shed,  I wasn't confident that I would be able to get the corners matching and the seams, well seamless, on my first attempt.  So off to the local welding shop I headed to get a quote on two metal bases, 35" in height, and 10" in depth, using 2" wide heavy metal.  After a quick calculation in his head he decided he could keep the total under $100.  After I committed, he asked how soon I would need them.  I desperately wanted to say immediately, however, my honesty had me replying that it was just a project for my home so there was no real rush.  2 hours later I received a call that my table legs were ready!!!  He ended up being held up waiting for material on a big project and it was the perfect little filler job.  The price was bang on $100.  Not the least expensive legs in the world but many of the other options I was pondering in my head would have came to at least that.  And each base was perfectly matching, and the seams were smooth!!!


I sanded the bases with 120 grit sandpaper and then primed them with Zinsser Bulls Eye primer.  I painted it on but I would recommend using spray primer.  I just didn't feel like forking out more money and I already had this primer at home.  So I carefully sanded between each coat of primer 3x.


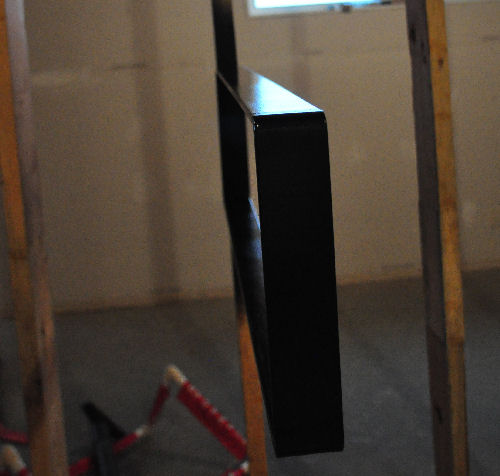
I screwed the bases to the studs in my workshop so that I could work all sides without having to wait for the paint to dry.


 One thing I learned while researching how to get a realistic chrome look was that a glossy black undercoat enhances the reflective qualities of the chrome paint.  So three coats of Rustoleum's gloss black were sprayed on.


I picked up two cans of Dupli-color's Chrome spray paint from Napa Auto Parts.  It seemed to be the best chrome paint under ten dollars a can.


I sprayed three light coats and the last coat I applied a little heavier to get a smooth finish.  Then you MUST walk away for five days.  Touching this paint within the five days will tarnish the chrome.  It has to be fully cured before it is handled.  Trust me.  Also, you cannot apply a clear coat.  It will ruin all the reflective qualities of the paint and leave you with a flat grey.  I tried it on another piece of metal.  Just to be sure.  It's true.


Then I attached my bases to the barnboard plank.  I used a framers square to make sure It was square to the edges and not to the uneven ends.


Check out that gorgeous texture! 


A few days after I had the table completed, my Mom informed me that she remembered the origins of the barnboard and why they had it in their shop.  It came from the McMillan homestead where my grandfather (who passed away in a tragic accident when my mom was 4) grew up.  I loved the table before, but now it has a special story to go with it.