Wednesday, June 20, 2012

Wonderful wood!

Hi, Joanna here! I’m a writer for Design Shuffle, an online portal for interior designers to show off their work and for design enthusiasts to enjoy. I love every minute of my job. I get to bring together the coolest interior design ideas and images and share them with blog readers like you. Thank you Timber & Lace for allowing me to share today!

Wood is one of those elements that are so versatile in its many tones and finishes. For example, it can bring warmth to a dark kitchen or a rustic feel to a modern space. You can mix wood types and finishes within the same room to add interest and texture. Following are a few ways to add wonderful wood to your world.

Wonderful Wood

This au naturel space gives bare wood a good name. Raw wood on the walls, floors and furnishings make for an inviting and relaxed place to while away the afternoon with family and friends.

Wonderful Wood

An accent wall of wood adds interest and texture to this modern space with concrete floors and white walls. Does this give you any decorating ideas of your own?

Wonderful Wood

Love the light fixtures in this modern dining room. The forest scene on the wallpaper beyond gives a dining outdoors feel.

Wonderful Wood

A hefty wood table seats four on small stools. What a wonderful place to have a family breakfast.

Wonderful Woodl

Dark woods surround this tiny kitchen. The stainless appliances and gray cabinets add enough light to make the space intriguing.

Wonderful Wood

Bent wood chairs in gray tones look quite at home dressed in fur and sitting at a rustic table—so inviting.

Wonderful Wood

Looking for contemporary bathroom designs? Consider adding this unexpected addition—gorgeous wood vessel sinks. This pair provides just enough wood tones to keep this sleek bathroom from being too severe.

Wonderful Wood

Twig lights, such as these, would add a glow to an entry table or on the dining table during a special occasion. These little beauties inspire big party ideas. Images 1 | 2 | 3 | 4 | 5 | 6 | 7 | 8

Wood is one of the hottest trends in design right now! Find even more wood inspiration on Design Shuffle here!

Tuesday, May 29, 2012

Master Bedroom: Building the Bed

I am apologizing in advance.  There are a few steps I failed to take pictures of.  Apparently I got too busy and missed documenting a few steps.

I started with a 6' long piece of 8 x 8 timber. With the assistance of my father we cut the timber down into four 2" boards using the bandsaw.


We then glued and clamped these boards together. 
Don't mind the dark stain on one.  One side of the timber had been stained for the exterior of our house before I was informed that it wouldn't be needed.
While waiting for the glue to dry I drew out the shape I wanted for the headboard.  You can see from the various lines that it took me a few tries before I got it right.

Once I had my shape ready I cut it out.

And then propped it against the wall to make sure it was going to work like I wanted.

Once back out in my Dad's shop, we traced my cardboard pattern onto the timbers and cut it out using the bandsaw. 

I really can't take much credit for this step.  He did most of the work.  I simply helped support the headboard.

This is where there is a large gap in the photos.  Next step:  sanding, sanding, and more sanding.  I only sanded mine to 60 grit as I wanted a rustic look to remain. 

Then I stained it with early american stain by minwax and finished it with three coats of glossy varathane.

Once inside we screwed the headboard into the wall.

Time to build the base. There are a many upholstered box spring tutorials floating around on pinterest.  They intrigued me but posing this idea to my father and husband they both agreed that there is no way that the box spring is designed to support the mattress with the addition of a few feet.  Therefore we had to create a frame for the box spring. 

Using 2x4 framing lumber, we created a base the exact dimensions of the box spring, adding a center support.  We then added 4 support legs that would not be visible once that bed is set up.  The base is screwed into the bottom of the box spring.  (I'm not sure if all box springs are the same but ours has a lite wood frame on the bottom.)


You can see our 2x4 legs in this photo placed at what will be the head of the bed but inset.  The legs coming down from the headboard are the 'faux' legs that will look like the base is using for support.

And two additional legs running down the center support piece. 

You can also see in the below photo how we clipped the corners to match the curve of the box spring.

Now its time to upholster both the 2x4 frame and box spring to create the base for your mattress.  I used 1/2" foam.  The foam was wrapped around the box spring and frame and stapled to the underside of the frame.  Here is another lack of pictures.  The top of our box spring has no wood but rather a metal cage-like structure so I simply wrapped the foam over the top by about 4 inches and hot glued it into place. 


Adding the fabric.  The fabric I selected is a dark grey heavy canvas type fabric (mixed fibers).  I wrapped it over the edge of the frame and stapled to the underside.

Folded the corners in and stapled away.

This is the top of the bed which will sit against the headboard.  I chose not to wrap the fabric across the whole top as it is not visible.

And again wrapped the fabric over the top of the box spring and hot glued.

I then screwed the legs that I made from the timber into the front of the frame. 

And positioned the base into place against the headboard.

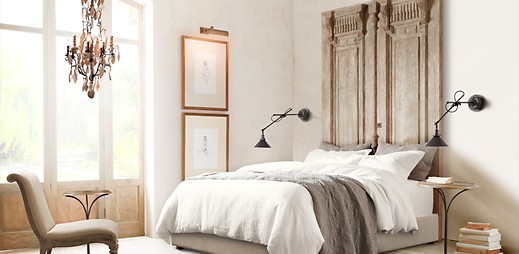
Complete! Now go dress your bed!

I'm extremely sorry for the lack of photos.  I thought I had done a better job at documenting each step.   I cannot stress how simple it was to build.  If you have any questions or need more details please email me and I will try to assist you. 

Thursday, May 24, 2012

Master Bedroom: The Before and After

Although any room decorating is never finished, I have completed most of the projects for my 'operation:Master Bedroom'.  You can check back at my inspiration and then plan for this space. 

So lets take a look at what I started with:


Not bad really.  Other than no headboard and a duvet cover that is 20" smaller that the actual duvet so bunches everywhere and doesn't adequately cover when sleeping, thus many cover wars.

A quick refresher of the plan:


And the real deal:


No the transformation did not happen overnight.  Or over a weekend.  In fact I have been working on this for over a month.  This biggest job was stripping and refinishing the furniture - not only the two nightstands you see in this picture but also a large armoire.  Then making the headboard and upholstered base, sewing the duvet cover and bolster, and redoing the lamps and shades. Yup - all DIY.   


The view from the ensuite:


I really like how the natural stump stools tye in with the new headboard.


The updated end tables work great with the headboard thanks to my inspirational kitchen photo.


A close-up of the textures I used in the bedding.


The small touch of the wood buttons also helps bring things together for me.


And the lamps got a paint job and a new shade.


Of course I'll be back with all the DIY details.

Building a timber headboard and upholstered bed.
What I learned about stripping furniture.
Painting the lamps and DIY wood shades.
Sewing a bolster cushion from a throw blanket.
Sewing your own duvet cover and shams.


One more peak since I love our new room SO much.


Of course it could use some window coverings and a sitting area still.  I'll be waiting for inspiration and funds before I do any more in here.  For now I'll just enjoy all that hard work.

What do you think?


Wednesday, May 9, 2012

Mater Bedroom: The Plan


Here's the plan:

1. Refinish existing furniture with dark grey stain.
2. Create headboard from last remaining leftover timber.
3. Create upholstered base for bed and add timber legs.
4. Move existing living room rug into Master Bedroom.
5. Sew linen duvet cover and shams.
6. Update existing lamps.

Other details:
-the wall color will remain the same (Willow by Benjamin Moore)

Tuesday, May 8, 2012

Master Bedroom: The Inspiration


It has been my intention for a long time to make some changes in our master bedroom.  However, my husband's decorating philosophy is; 'if it ain't broke, don't fix it' so it has never been high on the priority list.  We have some great furniture pieces in our room that was a generous gift from my in-laws for our wedding 11 years ago that are still in perfect condition. The only problem is they are not entirely 'my style'.  They were selected before we were even living in our first house, when I was 19 and didn't really know what my style was.   For my birthday this year all I wanted was permission to change our master bedroom.  How could he refuse such a simple request?

So I knew I wanted to change things, but to what? I soon began gathering ideas together to be a starting point for our master bedroom.  And what better way to keep all those ideas together in one place than pinterest.


In-spi-ra-tion:  a stimulant to creative action.


Lets take a look:


A real hodge-podge of things going on.  Yes, there is even a kitchen in my master retreat board.  I'll explain.

I plan to build a bed!  Not just a headboard with a bedskirt to cover the metal frame that holds up the box spring.  But an actual bed. 

Restoration Hardware
         A wood headboard, upholstered rails and wood feet.

Restoration Hardware


Some possible Headboards.
The Inside Story
McGill Design Group


Source Unknown
And since I will be working with my existing furniture and adding some new things in (ie. new bed) here is some inspiration for mixing wood tones, and new and old wood.

Its a start.  It gave me enough direction to make a plan. 

"Inspiration is fuel for taking positive action and moving forward in a new direction."

Tuesday, March 27, 2012

Music Room Update

 I completed the painting of our music room.  It is Benjamin Moore's Iron Mountain.  And of course I can't just paint a room and not move things around a bit.


I really like how the color of the piano looks against the new color. (I can't seem to get a good picture though.) 

Here's how the room started.  A quick move in and furniture that has no where else to go.

And then I repainted the china cabinet.

And now painted the walls.


Thursday, March 22, 2012

Thursday, February 16, 2012

Some Travel Sewing

In preparation for our families trip to Maui, I have been busy sewing a few things.  I guess you could say the excitement of our upcoming holiday has me taking a break from home decor.


1. A wallet for my son using noodlehead's great tutorial.  Made entirely from fabric and notion scraps. I added a change pocket to his.
2. A messanger bag for my daughter inspired by Gingercake's.  Again using fabric scraps.
3. A dress for my daughter using i candy handmade's tutorial.  An old tank top and clearance bin fabric.
4. A bolero for my daughter inspired by Heidi and Finn's Bolero Pattern. Remade from an old sweater of mine.
5. A carry-on bag inspired by this Bench Sports Bag.  It is the perfect carry-on size for packing my kids clothes.  Made entirely from left-over suiting material and 2 old bags. 
6. A sweater coat for myself inspired by a Pusch sweater my sister owns. 2.5 meters of clearance bin jogging fleece.

Am I done?  Depends how much more I can squeeze into the next 2 weeks.  I hope to remake an old skirt into a sundress, and some little pods for all our ear phones to keep them tangle free.  Also possibly remake a couple of t-shirts.